How To Fit A Shower Screen

How To Fit A Shower Screen

How to fit a shower screen


It's easier than you think to fit a shower screen and it's certainly easy for a competent DIY'er.
If you don't fancy getting your hands dirty, ask your plumber or tiler if they are able to fit for you. Ideally, two people are better when installing a shower screen.

Installing a shower screen with the correct tools and fittings should take 1-2 hrs

You may need

  • Type of Tile/ Substrate your fixing to
  • Size of the Glass Screen you have purchased
  • Your competence level or those of whom are going to fit
  • Tool Kit you are using

With the above in mind, you are now ready to go, but before you do I recommend having a quick look at the tools we use.

Another thing to consider is are you fixing an off-the-shelf shower screen or a bespoke/ custom shower screen?

What's the difference between an off-the-shelf and a custom shower screen?

The main difference is an off-the-shelf shower screen will come with all the fixings required. A custom screen or bespoke shower screen generally does not come with fixings at all.

Here is a list of the suggested tools to fit the U-channels to the wall that keep the glass in place. (bespoke shower screen)

Tools/ Accessories

Drill bits
Brown plugs

Spacers/ packers
Silicone

84200-drill-bit.jpg

Installation Preparation

When you are ready, we can start the installation.

Note: The room Should be tiled, grouted and the shower tray/base/tiles are all fitted and the adhesive used is cured.

Ideally, its good practice to have the room clean and tidy and make sure the base of the shower tray is clean. Use towels or a dust sheet to stop any tools/dirt or dust from damaging the shower tray.

Fitting the U-channel or wall mount

Fixing channels come either with drilled holes or not. (our product does not)
You would need to drill 3-4 holes along the length of the Channel, you will also need to cut the U-channel to the length of the Glass.
Our U-channels like most are, made of Aluminium and then anodised. They are easy to cut with a Hacksaw or a small grinder. You can file down the burred edges with a small file or sandpaper.

Levelling and marking the U-channel:

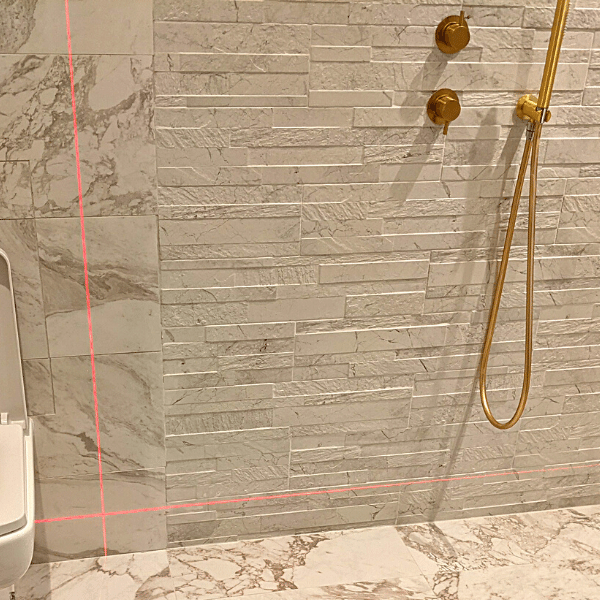
To fix a u-channel it must be plumb up the wall side so you will either need a laser level or a spirit level to make sure its plumb.

laser-levelled-for-uchannel.png


With a laser level:

Mark the position of the 'Outside U-channel on the base of the tray (we suggest coming in 10mm from the edge of the shower tray) to where the glass will be located.

You can now turn on the laser level and point the laser line to the mark made in the previous step. Now, make a couple of marks with a pencil up the vertical length of the line.

You can now hold the outside of the channel to the marks made, then with the pencil, mark the 3/4 holes done before.
If using the spirit level, place the bottom of the channel in the chosen location and then use the spirit level and adjust the U-channel until its plumb.
Repeat the same process by marking the holes.
Remove the U-channel and you can now drill the holes.

Drilling the wall:

If you have chosen to use the drill bit we have recommended, Keep a cup of water nearby so when you drill the holes, you can dip the tip of the drill bit to keep cool.

By dipping the drill bit into the cup, it will also it will last longer, especially if you are drilling porcelain tiles. That has a hard surface
When drilling, please be careful to not drill through pipes or electrical cables that could be hiding behind the tiles.
(check with a plumber or electrician if it is a new shower room)
Now that the holes are drilled, fit the brown plugs into place.
Use a little silicone into each hole and then place the U-channel over the top onto the tiled surface.

Fixing the U-channel.

This process is pretty easy, that you do this with a hand screwdriver rather than an electric screwdriver so to not bend or damage the channel or mark the 2 outside lips of the channel itself.
So to round up, that's the mechanical work done...
if you are not clear, have a quick look at this video, its the first section only you would need.


Preparation.

Clean all the faces from dust and debris, and make sure the tray is clean as we will need to silicon the glass to the tray.
If you are fitting the shower screen onto a shower tray, it might be worth using a couple of small shims.
This will protect the glass from damaging the shower tray when the glass goes into position.


Lifting the glass.

Depending on the size of the glass, its ideal for 2 people to carry out this stage, Professional installers usually have one person lifting the glass and one holding/ watching and guiding the glass into place.
You can use glass vacuum Lifters or your hands.
You should wear protective eye glasses and gloves if the glass were to break at this stage.
Slide the glass into the u-channel and make sure it goes as far back into the u-channel as it can (16mm depth inside ours) but dont force it.
Once the glass is in place you can now relax as it leads us to the last process.
If you are placing the glass directly onto tiles, we can supply clear translucent packers. It is recommended you do not place the glass directly on the tile without packers as it it much more likely to cause damage to the glass itself.

Sealing

Some glass panel manufacturers have sealing strips and bonded fixings rather than use silicone. The below may not apply to you.
The professional installers use silicone, it is quicker and will give a better finish.
We use the silicone process for our channels and shower glass screens as they are bespoke.
For this process, the glass, U-channel, glass and tiles must be dry, clean and in the correct position. All before siliconing commences.
We normally silicon the base and the wall side of the tray at the same time...

Video below.

Please note on this video he is using glass cleaner which can be found here along with the sealant EU33SC that you can purchase directly from us.
Its takes a little practice but its an easy job to learn... one skill the majority of competent people can't do until they see the video.

When siliconing, you will need to:

a) Silicone the U-channel to the wall
b) Silicone the glass to the U-channel
c) Silicone inside and outside of the glass

When do I need a support arm for the shower glass

If your glass panel is over 700mm in width, the general rule of thumb is to use a support arm.


There are plenty of Support arms available including:

  • Ceiling mounted
  • Wall to glass
  • 45 Degree wall to glass
The bracing arms are easy to fit and come in 1 meter lengths. They far outweigh the quality of most other support arms that can be found on the market.
Product codes for a simple complete arm are:
SUP10CH for a chrome support arm suitable for 10mm and 12mm shower glass
SUP06CH for a chrome support arm suitable for 6 mm and 8mm shower glass

Final installation:

Silicone takes approximately 24 hrs to to dry so the shower can be used after this amount of time.
If you live in a hard water area and dont want to get any calcium build up we recommend the TPC16 Surface protection, this also stops the build up of soap scum and keeps the shower screen really clean.
If you want a squeegee, Try the 17600 Deluxe Shower squeegee


Finally, to keep the glass super clean and grime free use our glass cleaner which is the best on the market and produced in the USA with an amazing formula.It cleans everything!

We hope this guide has been useful for you, we would love to hear your challenges on your installation.
Please do add a comment or suggestion to champion our guide.

Other helpful Links

8mm Uchannel

10mm Uchannel

12mm Uchannel

Shower Glass Calculator

Enjoy your shower screen

18th Oct 2021 Jennifer Nethers

Recent Posts